🗣️ PTE Speaking: How to Ace 'Describe Image' with a 3-Step Template (2026 Strategies)
8 min read
2026-06-09
Master the PTE Describe Image task with a simple, modern 3-step template. Learn how to structure your response, use adaptable frameworks, and speak confidently for a high score.
EngSandbox Editorial Team
Written with AI assistance and reviewed by our editors — experienced PTE/IELTS tutors. Every article is fact-checked against official band descriptors, the Academic Word List and Cambridge assessment research, then field-tested with learners before publishing. Human reviewed + field tested. Questions? Contact us — see our Editorial Process.

PTE Speaking: Master "Describe Image" in 2026 with a Flexible 3-Step Method
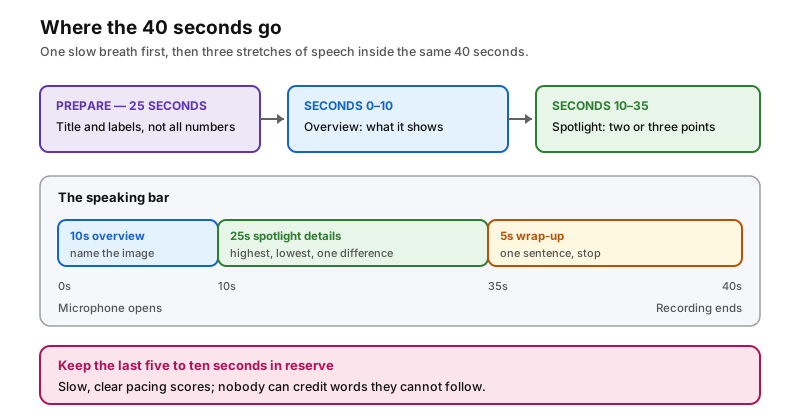
The screen changes, and there it is: a chart, a graph, or a map you have never seen before. In the corner of the screen, a timer starts counting down from 25 seconds. You have that brief window to work out what the image shows, and then the microphone opens and you must speak about it continuously for 40 seconds. If your pulse quickens simply from reading that description, you are in good company. Describe Image is the point in the PTE Academic Speaking section where learners most often feel the clock pressing against them, and you will normally face three or four images of this kind during the test.
Here is the reassuring truth that comes from coaching this task year after year: Describe Image rewards a calm, repeatable method far more than it rewards lightning-fast English. You do not need a photographic memory or an enormous vocabulary. What you need is a reliable way of turning what your eyes see into a short, organised spoken story — and building that way of speaking together is exactly what this guide will do.
Why Memorised Scripts Now Hold You Back (The 2026 Scoring Update)
If you have watched older preparation videos, you may well have been told to memorise a strict, generic template. Those old templates usually sound like this:
"The image shows a beautiful and interesting graph. The maximum value is X. The minimum value is Y. In conclusion, the image is very informative."
My strongest advice for 2026 is simple: retire that kind of script.
The reason is a genuine change in how the test is marked. Historically, spoken responses were processed entirely by automated scoring. According to Pearson's published scoring updates, however, things moved in November 2024: the Content score for Describe Image (and for Retell Lecture) is now double-checked by human raters working alongside the automated system. From August 2025, human review was extended to further speaking tasks as well.
What does this mean for you in practice? Under Pearson's official scoring criteria, Content measures how relevantly and accurately your response describes the image in front of you. A script that could fit any picture describes nothing in particular, so however fluent it sounds, it earns little or nothing for Content. Human raters listen for evidence that the speaker has genuinely looked at, understood, and thought about this particular image — and a memorised monologue simply cannot provide that evidence.
Please do not let any of this frighten you. Honestly, I think it is wonderful news. You no longer have to hold a rigid script in your memory while simultaneously analysing an unfamiliar chart under time pressure. You are free to speak naturally, the way you would explain a photograph to a friend.
The Anti-Template: A Flexible 3-Step Framework
To succeed under human review, we need what I call an anti-template: a logical framework that guides your thinking without forcing unnatural words into your mouth.
Why only three steps? After listening to hundreds of learners under exam conditions, I can promise you that a stressed brain can juggle only a handful of instructions before it freezes. A seven-part plan collapses at the worst possible moment; a three-part plan survives. We are keeping this strategy deliberately small so that it keeps working when your nerves are loud.
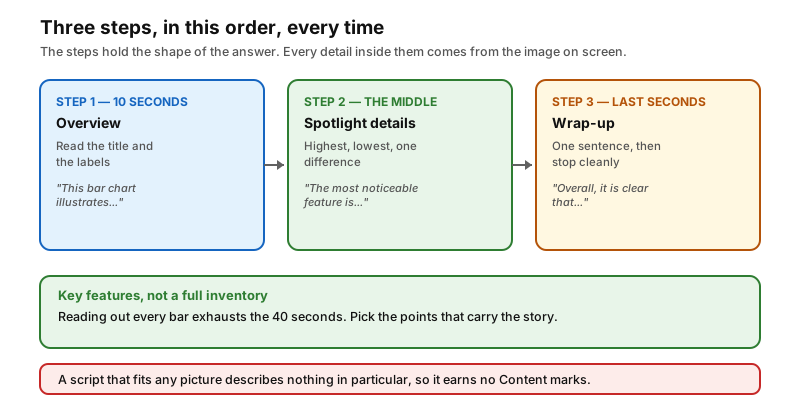
Here is the framework:
Step 1: The 10-Second Overview (Identify the Main Idea)
When the image appears, do not panic, and do not try to read every number. Spend your first few seconds on the title and the labels. Your only job in Step 1 is to tell the listener what the image is about and what the overall picture looks like.
- Natural phrasing: "This bar chart illustrates..." or "Looking at this graph, we can see the changes in..."
- Example: "This bar chart illustrates how much coffee people consumed in three different countries from 2020 to 2025."
Step 2: The Spotlight Details (Pick Two or Three Key Data Points)
This is where many learners go wrong: they try to read out every bar, every slice, every line. In 40 seconds that is impossible, and the attempt makes you race through the early details and fall silent halfway through. Remember what the Content criterion actually rewards: a summary of the key features, not a full inventory of the data. So pick the highest point, the lowest point, and perhaps one interesting difference between them.
- Natural phrasing: "The most noticeable feature is..." or "On the other hand, the lowest number can be seen in..."
- Example: "The most noticeable feature is that Finland had the highest coffee consumption throughout the period. On the other hand, the UK showed the lowest figures, although those numbers slowly increased towards the end."
Step 3: The Wrap-Up (Conclusion or Implication)
When roughly five to ten seconds remain, calmly bring your answer to a close. You do not need a profound, world-changing conclusion. Summarise the main trend in one sentence and stop cleanly.
- Natural phrasing: "Overall, it is clear that..." or "To sum up, the general trend shows..."
- Example: "Overall, it is clear that coffee drinking became more popular in all three countries over these years."
Notice the difference. This anti-template contains no robotic filler sentences. It gives you a safe path to walk down while you supply all the details naturally. It sounds like a person speaking — because it is one.
The Same Three Steps Applied to Two Different Images
Frameworks become real only when you watch them work. The two images below could hardly be more different, yet the underlying moves stay identical. As you read, pay attention to how the language changes but the logic does not.
Example A: A Pie Chart (Topic: Sources of City Pollution)
- Step 1 (Overview): "This pie chart breaks down the main sources of air pollution in a major city."
- Step 2 (Key Data): "It is immediately obvious that vehicle exhaust is the biggest problem, making up nearly 50% of the total pollution. The second largest source is factory emissions at 30%, while household heating accounts for only a tiny slice, at just 5%."
- Step 3 (Wrap-Up): "Overall, if the city wants cleaner air, reducing car traffic should be its main priority."
Did you spot the technique in Step 3? Rather than repeating numbers, the speaker draws one sensible implication from them. Raters reward that small act of thinking.
Example B: A Map (Topic: Floor Plan of a Library)
- Step 1 (Overview): "This map displays the layout of a modern public library."
- Step 2 (Key Data): "Right at the entrance, visitors can see the reception desk. If we move to the left side, there is a large computer area for studying. Interestingly, the children's reading room sits in the far right corner, probably to keep noise away from the quieter study zones."
- Step 3 (Wrap-Up): "Overall, the library is well organised, with clear divisions between noisy and quiet areas."
With a map there are no numbers at all, yet the same three moves carry you through: name the place, walk through its most notable areas, and finish with one summarising observation.
Two very different pictures, one identical structure. Once you can narrate images this way, you do not need a script — you need only your eyes and your three steps.
Three Mistakes I See Learners Make Again and Again
Even with a sound strategy, certain habits quietly cost marks. These are the three I correct most often when I review recorded practice answers.
Mistake 1: Stopping to Repair a Grammar Slip
Mid-answer, you might say "He don't understand the question..." when you meant "He does not understand the question..." The instant the slip leaves your mouth, an inner voice urges you to stop, apologise, and repeat the sentence properly. Do not listen to that voice.
Years of listening to recorded answers teach the same lesson: listeners judge smooth, continuing speech far more generously than perfect speech delivered in broken pieces. Every fluent speaker of every language makes small slips while talking — that is simply what natural speech sounds like. What damages your Oral Fluency score is halting, rewinding, and restarting, not the slip itself. Note the error silently if you wish, and simply use the correct form in your next practice session.
Mistake 2: Falling Silent While Thinking
Silence is the enemy in a speaking test. If you lose your train of thought, do not freeze; buy your brain a few seconds with a natural connecting phrase instead:
- Instead of silence, say: "Another interesting detail to note is..." or "Let me also point out that..."
These phrases carry very little information, and that is precisely their virtue: they keep your recording alive and sounding fluent while you locate your next idea.
Mistake 3: Racing Through the Answer
Many learners believe that fast speech proves fluency. It does not. Clear, moderate pacing is far easier to score well on, because nobody can credit words they cannot follow. Speak at the comfortable pace you would use when reading a story aloud to a child: unhurried, distinct, and steady. Paradoxically, slowing down often makes you sound calmer and more confident within seconds.
Keeping a Steady Head While the Timer Runs
A speaking test examines your nerves almost as much as your English, so protecting your composure is a legitimate study activity. Here is how I teach learners to do it.
Reframe Who Is Listening
Anxiety narrows attention: the more frightened you are of failing, the less working space your mind has left for the actual image on screen. So change the picture in your head. The rater listening to your recording is not setting traps for you; their job is to hear what you can do with this image. Imagine explaining the chart to a friendly colleague who is simply curious. And if it helps you relax, smile as you speak — relaxed speakers breathe more freely, and their voices tend to sound warmer for it.
Take One Breath Before You Look
When the 25-second preparation timer starts, resist the urge to pounce straight at the image. First, take one slow breath in through your nose and let it out gently through your mouth. A slow exhale settles a racing pulse, and a settled pulse leaves room for clear thinking. This habit costs you two seconds and repays you in composure across all 40 seconds of speaking.
Count the Small Wins
Do not measure your progress only against an imagined final result. Celebrate the new word you learned today. Celebrate the ten minutes you practised while dinner cooked. Confidence in speaking is assembled from small, repeated proofs of ability, and every single proof counts.
Fitting Describe Image Practice into a Real Life
You have a life beyond study — a job, perhaps a family, perhaps university deadlines. Some weeks, a long study session is simply not realistic, and feeling guilty about that helps nobody. Instead, shape the practice around the week you actually have.
Choose short, regular sessions. Ten focused minutes on Monday, Wednesday, and Friday will serve you better than five exhausting hours crammed into Sunday. Revisiting a skill at intervals — after a little forgetting has crept in — forces your brain to rebuild it each time, and that rebuilding is exactly where durable learning happens.
Turn everyday images into practice material. You do not always need a textbook or a laptop:
- At a cafe, study the menu for 25 seconds, then spend 40 seconds describing it aloud: "This menu shows the prices of hot drinks. The most noticeable feature is that large coffees are the most expensive..."
- Open your phone's weekly Screen Time report and describe your app usage using the three steps.
- Watch the weather forecast on the evening news and summarise the chart out loud.
Make this a normal, even playful part of your routine, and something valuable happens: the method stops being a method and becomes a habit. When the test image finally appears, your mind will step onto the familiar path automatically, without you having to force it.
Where to Go from Here
Describe Image can look like a mountain from a distance, but nobody climbs a mountain in one leap. You climb it the same way you will speak on test day: one clear step at a time.
Your whole strategy fits into three lines:
- The 10-second overview — what is this image about?
- The spotlight details — which two or three points matter most?
- The wrap-up — what single sentence sums up the trend?
Trust the work you are doing. Speak clearly, let the small slips go past, and give the method a fair number of repetitions before you judge it. Every calm, complete description you produce in practice is a deposit that your future self will draw on at the microphone. Keep going, a few minutes at a time — the method will be waiting for you when the timer starts.
Related Articles
🎙️ PTE Retell Lecture: Template and 10 Practice Topics
Master the PTE Retell Lecture task with a proven template and 10 practice topics. Learn how to organise your notes, structure your response, and score higher.
✍️ PTE Essay Writing: How to Score 70+ with a Simple Template
Master the PTE essay with a simple, repeatable template. Learn how the automated scoring works, manage your 20 minutes effectively, and use a proven structure to score 70+.
🎯 IELTS vs. PTE: Which English Test is Right for You?
A comprehensive comparison of IELTS and PTE Academic to help test takers choose the right English proficiency exam for their study abroad or visa goals.